This is a yummy recipe that is very quick and easy. And it tates so creamy! I am sure you will enjoy it.
1- can cream of mushroom, or chicken soup
1- 12.5 oz. can chicken or 2 cups diced chicken breast pre-cooked
2- small or 1 large can diced green chile (optional, or cut in half)
Garlic to taste
1 cup sour cream ( I use fat free)
1 cup monterey jack cheese
Mix all ingredients together, Roll up in flour tortillas, fin into a 13 X 9 pan. Top with enchilada sauce and sprinkle with one more cup of cheese.
Bake at 350 degrees for 30 minutes or until cheese melts.
~Elisa~
12/5/10
11/29/10
Dress to Skirt
Sorry to say, but i wasn't too impressed the recipe i was going to post that sounded delicous! I am finally starting to feel better, so i have started projects again! There are a few more that I have done that I can't post pictures of because they are presents for people who look at this blog! So here is my first official post of being back to work! (well, back to projects at least) I forgot to take process pictures, but i will explain what I did. I also haven't gotten a good after picture she would keep the headband on for. But I will work on that, and post one later.
~Elisa~
Ok, this is how the dress started. It was a halter style, but was too snug around the ribs. there was lots of fabric on the lower section, because it had been gathered so it would flare. i wasn't able to give up the dress yet, because I loved the fabric, so i decided to change it into a skirt with matching headband. first i unattatched the halter part from the bottom, Then I just sewed the bottom to a piece of elastis I measured around my oldests waist, so they could both wear it. Reatached the ribbon to act as a belt when my younger one wears the skirt, and it was already hemmed! It was very easy and didn't take me long at all. Then I used the halter part to make the headband. Since it was double sided, all I had to do was sew it to my desired lenth, and then use the extra cut off fabric to make the flowers. They are just torn strips of fabric layered to look like a flower, and then a button placed in the middle. I made it long enough so I could wear the headband to, And it is super cute on both little girl and adult. I just may have to borrow it a time or two!
~Elisa~
11/11/10
Missing in Action
Sorry I have been missing in action. We are almost 8 weeks along in the pregnancy of our third child! Super exciting, but it has kept me a little under the weather, and has basically put a halt to all my painting projects, and I have ALOT of those on my list to do! So I will try to get back in the swing of things soon, as soon as this morning sickness (more like all day) goes away! I think I am starting to feel a little better, but that is really just some days are better than others. I have a recipe I will post today or tomorrow that is YUMMY! I had enough energy to do that as my project for the day. So stay tuned. And once again, sorry i have been missing in action for those of you who follow along.
~Elisa~
~Elisa~
11/6/10
Quiet Books
Sorry I have been absent from posting. I have been feeling a little under the weather, and unmotivated lately, but I have still been busy. I had started this project like a year ago, made the covers, a few pages, and then stopped. Then finally I decided to just Work, work, work on them until they were done. So now I can say that I am done! We had an activity at church were they had ideas to use and follow a pattern (I think). But I do better without patterns. So I took a few of the ideas from church, and then did my own spin on the books. I made up my covers, made the pages bigger, and put them on rings instead of sewing them to the outside of the book. Some of the pages are the same, but different, and then some are completely different. I still have lots of ideas, but they are already kind of stuffed with fun stuff. The good thing about having them on the binder rings is that I can change pages out when they get bored!We'll have to see on Sunday at church how well that hard work paid off. If they keep us QUIET, then I know it did!
The covers are made of flannel lined with interfacing to make them a little more sturdy, but they are still soft and bendable. I made handles so they could carry them easier. And added their initials so they knew which one was theirs. I have a feeling they are going to fight over them anyway, but maybe when they are older it will all work out!
Here is a clock to practice numbers, and then some cool sewing games from the Target dollar section in the "extra stuff" pocket.
This page has the flowers that are attatched with buttons. This way they can practive buttoning. And the show to practice tying shoes.
Here is one of my own ideas. It is an oven and cupcakes. I should have used a shiny silver fabric to resemble a cookie sheet but I tried to make most of it using scrap fabric, so this was the closest I had.
They can use the hot pad to take the cupcakes out of the oven to put in the right color on the tray.
I found these little skirt purses at the dollar store that work great for storing their letter flashcards., and The glove was one of the original ideas when we made them at church.
Here is another one I made up. A day at the beach. They have to get the items out of the beach bag and match it up with the word on the beach.
Right now I only have one puzzle made up that covers the whole page, but the goal is to have 3.
Here is a fun one I came up with for the purse. I wasn't sure what to put in it, and then decided to make some makeup out of felt and some interfacing. Then I use permanent markers and nail polish to make the colors of the makeup. And to the side of tht is 2 pockets that hold a notepad and pen to write letters.
Then the letters can go in the mailbox! That was also one of the original ideas from our church activity.
Here is another clock in the other book, just different colors.
Once again, here are some repeat pages but in different colors.
Same thing.
Ok, here is a new one. I made the one up pf the tree with owls. Each owl is numbered and you are supose to match it with its number, and then the next page was from the class. It is a weaving game.
And one last repeat, still different colors.
Here is one of my girls LOVING the Busy/Quiet Book! Of course she chose to do her sisters book, and not hers, even though hers has more pages!
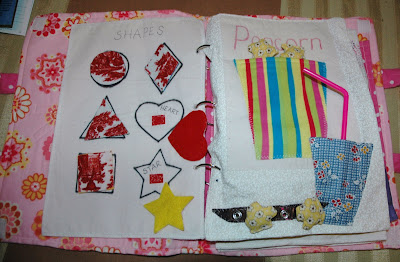
I am not sure why, but blogger put this out of order. Anyways, it is a matching shapes game, and then practicing snaps by taking the popcorn out of the bucket and snapping it to the dish. I will post more pages as I make more, but that may not be for awhile. I am kind of looking forward to quiet book break!
~Elisa~
10/26/10
Repurposed Soap Dispenser
10/23/10
A little Rocker.
We are borrowing this rocking chair from my parents house. My mother has quite a few little chairs, and she let me borrow this one that was mine and my siblings when we were younger. I didnt' want to paint it very bad, because I like the "old" look it had. So instead I made some pads for it that matched the little table cloth I made for the puzzle table.
Here is the before of the chair
Now draw your desired shape size on the back of your fabric,
Make as many cords as you want for tying the pad to the chair,
Pin the cords into place. You want them facing in as you sew around the edges so when you flip it around they are facing out.
Then lay the othe side of the cushion over the pinned cords, and serge around the edges, leacing the bottom open.
Flip in around and you have your casing.
Now fill to the desired fullness with fiberfill.
This is what it should look like.
Then sew lines to make it look quilted. You can do any pattern you want, I went both ways, so there is just little squares.
Continue all steps for the bottom cushion.
And here is the finished product. My two year old who thinks this chair is hers, loves it. She always sits on it and says "Nice!" So I guess that means she approves!
Here is the finished table and chair together.I think it looks nice and finished with the red kitchen. What do you think?
~Elisa~
A FREE table - Perfect for the kids
So my dad came across this little table left in a field or something, and thought of me! What a nice Dad, I know! I knew I could do something to disguise the top, but wasn't sure how painting it would turn out. Until I become more adventurous with the little table I came up with an alternate plan. I added some foam board to make it have some storage, and quickly serged a little table cloth with some fabric I've had in my closet for quite some time. It took all of 10 minutes at the most. The foam board was from the dollarstore I had leftover from a project. I just measured the size I needed, cut it to scale, and then cut the corners off so it would fit around the legs of the table. It is a great shelf for puzzles and coloring books.
~Elisa~
~Elisa~
10/21/10
A little Door Decor
I needed something on the girls door... Just Because. So I started looking through my craft room for some ideas. I had no idea what I wanted to make, but had to see what I had to make something out of. I came across some ribbon (large 6 inch wide) that I had got on clearance along time ago to make tutu's out of. But it was too stiff for tutu's. It is an ivory color (almost yellow, but looks ivory in person). Then I came across this circle that I had kept from a diaper genie refill (generic brand from walmart I didn't like, and didn't use, because it was separate bags wrapped around this ring that made it not work correctly). Anyways, I figured I could use the new clean circle for something eventually. So I added the ribbon to the circle the same way you would add tulle to an elastic for a tutu (I'll have to pot a tutorial so you can see the method, very simple). Then it needed something more. I thought A bird would be cute since the girls room had birds on the walls now. The only problem was that I didn't have one. So I cut out a bird shape from some scrap fabric (right sides together), sewed it together, leaving a small opening on the bottom, turned it inside out (which was right sides out now), put a little fiber fill inside, and sewe up the bottom. Then I added a wing with some leftover tulle, hand stitcher d alittle eye, and added a little beak. (sorry my camera was dead at the moment, so I wasn't able to take pictures of the process. I really need to keep my backup battery charged!). Then i added a little bit of flowers, glued them both on, and I am pretty happy with their new door decor. I bought the command hooks to hang it on the door.
~Elisa~
10/19/10
Sorry
Look at that carrot next to the parsnip. It's HUGE!!
Sorry for the lack of posts lately. I have ben super busy with "other" things besides painting, but have tons to do on my "project to do" list. So stay tuned! I'm not gone, I promise. Here is just a look at some of our extra's from the garden. We (my 3 yr. old daughter) and I pulled out the garden for 3.5 hrs the other day, and found all these yummy veggies! Anyone have a good recipe for green tomatoes, and the only requisite is that they can be little tomatoes used. I have TONS of pear tomates that are green, and I am trying to think what I could possibly make with them so I don't have to throw them out. So if you know of anything, PLEASE pass it along.
~Elisa~
10/15/10
White Chocolate Lavender Scones
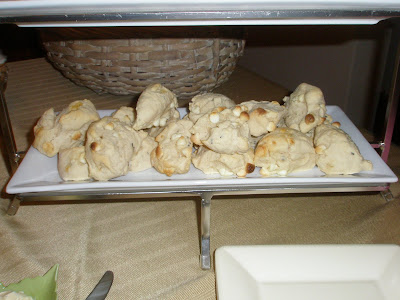
These are DELICIOUS! They may sound a little weird, but once you try one, you won't be able to stop! You'll have to have at least one more. This recipe is from a friend of a friend. I would link this to her blog, but it's private, so just know, this wasn't my recipe, but I use it often now!
White Chocolate Lavender Scones
Ingredients:
3 1/2 c flour
2 T baking powder
1/2 c sugar
1/2 c unsalted butter
2 T food grade lavender
1 to 2 oz white chocolate, chopped into small pieces (or use chips)
2 t vanilla
1 to 1 1/4 c half and half or table cream
Preparation:
Preheat oven to 400F.
Combine the flour, sugar, and baking powder. Add butter by grating it directly into the flour mixture. Add the lavender & white chocolate; stir to incorporate. Add cream and vanilla. Start with 1 cup cream and 2 teaspoons of vanilla. Incorporate into flour mixture. Add more cream if needed or until you have dough that holds together. Do not over work the dough. Roll out dough to about 3/4 to 1- inch thickness. Using a knife cut dough into equal triangles. You can also use cookie cutters if desired. Place on baking sheet or stone and allow to stand for 20 minutes.
Sprinkle the tops with sugar. Bake for 12 minutes or until slightly golden on the top.
~Elisa~
10/12/10
Apple Juice
We received an abundance of apples, and with one of the bushels, we made 12 quarts of fresh apple juice. Boy was it YUMMY! I think we are planning on making at least one more batch, if not two.
We cut the apples in half, then realized they where small enough to keep whole, but that's ok. Now we know for next time. Then we borrowed my father in laws jack la lane power juicer, and juiced them all. It was FAST!
After that, the Ball Book of canning tells you to heat the juice to 190 degrees.
As it was heating up, we skimmed all the "stuff" off the top, leaving just the juice. Once it reached the 190 degrees, we ladeled it into our hot jars, secured the lids, and put them in our boiling water canner for 10 minutes. That's all, and they were done! The process was actually pretty fast. I think the longest part was cutting up all the apples that didn't need cutting.
We tried it Hot
And Cold, and it was delicious both ways!
~Elisa~
Subscribe to:
Posts (Atom)


